By leveraging some of the micro:bit's components, we can get information about how much light is shining on it.
For example, you can read the LEDs on the front to measure the amount of light falling on the front of the micro:bit. This functionality is available using JavaScript and PXT Blocks (MakeCode) or with MicroPython.
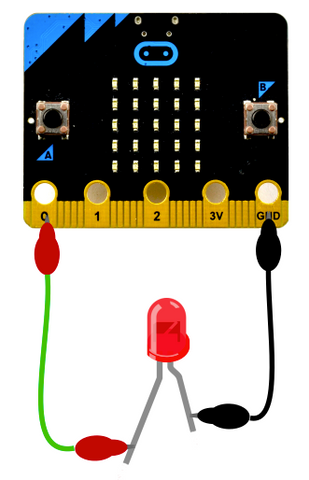
By connecting a Light Emitting Diode (LED) to the micro:bit, we can make the LED light up if it is dark. The longer leg of the LED is connected to pin0 on the micro:bit, with alligator clips, as shown below:
The following MicroPython code will light the LED when the micro:bit does not have light shining on it:
  from microbit import *

  while True:
      if display.read_light_level() > 1:
          pin0.write_digital(0) # turn the led off
      else:
          pin0.write_digital(1) # turn the led on
In PXT MakeCode, the equivalent is:

And there you have it - a simple automatic light, using only the micro:bit and an LED!
You could also substitute the wire for copper tape to adapt this circuit to a cardboard or 3d-printed model, or use radio to connect multiple micro:bits.
Although this is a great way to demonstrate the principles involved, for a more sensitive model you can also try the Kitronik Lamp:bit for the micro:bit.