
In this project, you will learn to:
-
Write a function to turn on individual Traffic Light LEDs
-
Call the function in your main loop
You will need:
-
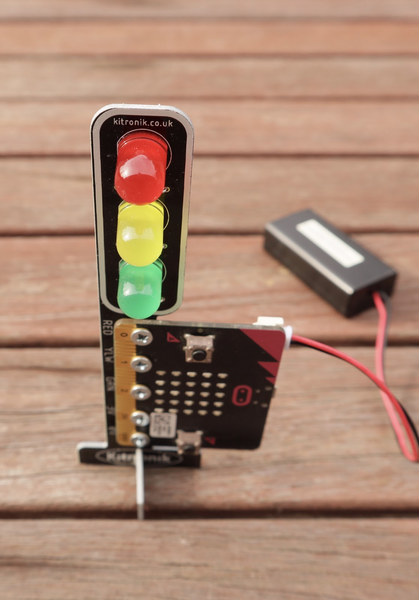
One Kitronik STOP:bit, assembled with a micro:bit
-
Micro USB cable for programming the micro:bit
-
Battery pack (2x AAA batteries) for the micro:bit
Step 1: Launch mu editor, and enable micro:bit mode
-
Go to Applications in mac, or the Programs menu in Windows, and launch mu editor by clicking the icon that looks like this:

-
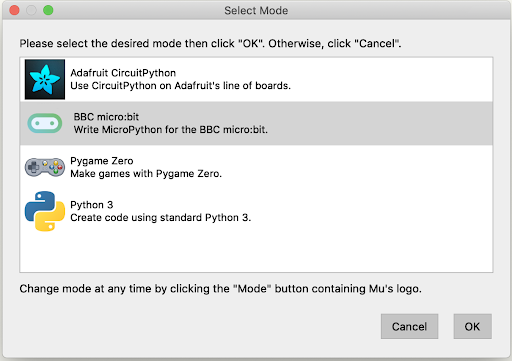
Once the editor is running, click on the Mode button

-
Click on BBC micro:bit so it is highlighted, then click OK.


Step 2: Write your code
Each traffic light is made up of three coloured Light Emitting Diodes (LEDs). Each LED has two wires; one connects to ground, and the other to pin 0, 1, or 2, on the micro:bit.
-
Type the code below into mu editor, then connect your micro:bit USB cable, and click the Flash
 button to download the code onto the micro:bit.
from microbit import * pin2.write_digital(1) -
If all went well, the green LED connected to pin2 should be lit! Try changing pin2 to pin1 and the amber LED connected to pin1 should now be lit.
-
Instead of a
.write_digital(1)to pin2, write 0 to the pin, and it should turn the LED off. -
Now click the save
 button on mu editor, and save a copy of your code as “stopbit.py” in your
 mu_codedirectory.
What our code does:
-
The LEDs each have one wire connected to ground, and one connected to a pin: 0, 1, or 2. We switch the power from low(0) to high(1) with our
write_digital(1) -
By sending to a different pin, we turn on a different LED.
-
Writing zero(0) to the pin will set it to low(0), and turn off the LED.
Step 3: Write a function to turn one LED on, and the others off
We can reduce the amount of code we need to write, by creating a function in Python2. We call the function by typing its name, and customise what it does by giving it information in a parameter, inside the brackets ().
-
First, delete the line,
pin2.write_digital(1)from your code in mu editor (leave the import line there). Now that we can turn LEDs on and off, let’s make a function to turn on an individual LED, and turn the others off. -
To start defining our stopBit() function, we add the following line, and add a parameter called colour. The parameter will tell our function which colour LED to turn on, when we later call our function.
def stopBit(colour): -
To put code in our function, we’ll indent3 it four spaces (mu editor will do this for us automatically). We indent it again to put in inside an if statement. So now our code should look like this (Note: the new lines you need to add are always in bold):
from microbit import * def stopBit(colour): if colour == "green": pin0.write_digital(0) pin1.write_digital(0) pin2.write_digital(1) -
Now that our function is defined, we can call it, and tell it what colour we want lit. Add the next line under your function, and make sure it isn’t indented, so it’s outside of the function definition.
stopBit("green")Now save your updated code in your mu_code directory again, then click on the flash button to send it to your connected micro:bit. Only the green LED should turn on. -
We still need to add two more colours to our if statement to let us turn on the amber and green LEDs - can you extend your code with elif to add amber and red colours to your function?
-
Once your function can handle “green”, “amber”, and “red” colours, make them loop forever in a while loop. In your loop, make sure tell the traffic lights to wait for some time between changes!
-
Test your code by flashing it to the micro:bit. It should cycle through green, amber, then red, waiting about 5000 milliseconds between each. Hint: use
sleep(5000).
What our code does:
-
Defines a function that accepts a colour parameter, which can accept 3 different arguments; “green”, “amber”, and “red”.
-
An endless loop calls our function to change the traffic light between 3 different states, shown in the state table below.
State Red LED Amber LED Green LED green off off on amber off on off red on off off
Congratulations! You’ve successfully programmed a single Australian traffic light! ![]()
Now you can get two traffic lights working together in Project 2: Two traffic lights