
 In this project, you will learn:
- how a relay works;
- how to use code to control a relay to turn a water pump on and off; and
- how to automate the pump based on sensor readings.
You will need:
- To have completed our previous tutorial for calibrating a moisture sensor, with the following:
- a micro:bit, computer with mu editor or Thonny editor (comes pre-install on Raspberry Pi OS), and a microUSB cable for programming the micro:bit
- a moisture sensor
Additional hardware required for this tutorial:
- 1 x submersible pump and hose to fit
- 1 x MonkMakes relay board
- 5 x crocodile leads to connect everything up
- 1 x old water bottle or similar container to hold water, and some scissors to cut the bottle.
Step 1: Connect the relay to a micro:bit
A relay is an electronic switch controlled by electrical signals. We’ll use the MonkMakes relay board for this project, as it is easy to connect with crocodile clips, and control with a BBC micro:bit. The MonkMakes relay turns on when it is receiving a high signal from the micro:bit. Relays come in a variety of different designs - some can turn off when receiving a high signal, or only turn on for a set time, for example.
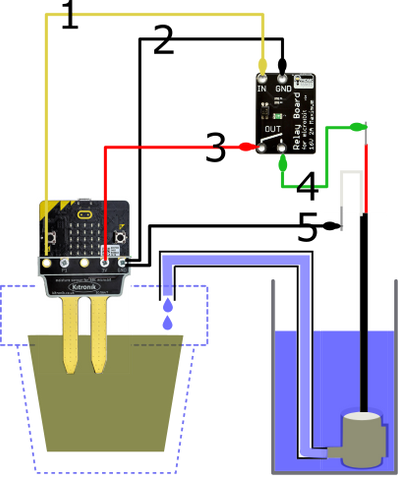
The numbers next to each lead correspond to the numbers on the diagram at the top of this project.
- Connect a coloured crocodile lead (1) from the first (leftmost) pin on your micro:bit, to the relay hole marked “IN”.
- Connect a black lead (2) from the micro:bit’s ground (GND) pin to the relay’s GND hole.
Check your connections to make sure they match the diagram - you have now connected your micro:bit to the relay board!
Step 2: Connect the water pump to the relay and micro:bit
At this step, we are using power from the micro:bit to power the pump. The relay will act as a switch to complete the electrical circuit and make the water pump run.
- Connect a lead (3) from the 3V ping on your micro:bit to the first (OUT) hole on the relay.
- Connect a lead (4) from the relay’s second (OUT) hole to the red wire on your water pump.
- Connect black lead (5) from the micro:bit’s GND pin to the white wire on the water pump.
Just to be sure, check your new connections with the diagram to be sure everything looks the same. You've now successfully connected your water pump to the relay!
The leads connected in Step 1 will carry a signal that controls the relay, and the leads connected in Step 2 allow the relay to complete the circuit that runs the pump.
Step 3: Write some code to control your pump
In our previous tutorial, you learned how to detect when our plant’s soil was too dry, by reading a number from a moisture sensor.
As a recap, our code worked like this:
- If our soil moisture above a certain level, display a happy face; or
- if our soil moisture was below that level, then display a sad face.
A sad face told us that we needed to water our plant. In this tutorial, we’ll go a step further and tell our pump to water our plant for us when the soil moisture level gets too low.
Our previous Python code looked like this:
    from microbit import *

    while True:
        moisture = pin1.read_analog()
        if moisture > 400:
            display.show(Image.HAPPY)
        else:
            display.show(Image.SAD)
The Python code to send a high signal to pin0, and turn on the pump is:
pin0.write_digital(1)
To turn off the pump, we need to set pin0 to low:
pin0.write_digital(0)
Adding these commands to replace our happy and sad faces, our code will look like this:
    from microbit import *

    while True:
        moisture = pin1.read_analog()
        if moisture > 400:
            pin0.write_digital(0)
        else:
            pin0.write_digital(1)
Test your code
Check that your code works:
- Cut the top off your disposable plastic water bottle, and place your pump in the bottom.
- With the moisture sensor out of the soil, the pump should run until you touch both legs of the sensor with your fingers to simulate moisture.
- Put just enough water into the water bottle to cover the pump.
- Put the moisture sensor into some dry soil and make sure the plant is on the same level as the pump, so the water doesn’t keep running when the pump stops (siphon). The pump should run until enough water is pumped into the soil.
Troubleshooting
- If something doesn’t work as expected, check your code to make sure everything is indented (moved in from the left) exactly as shown in the code samples in the tutorial. If you are using mu editor or Thonny editor to edit your code, you can use the REPL in mu or the Shell in Thonny to see if any errors are shown. If you are using the web editor, you may see an error scrolling across the micro:bit LED matrix, which will give you more information on what to look for.
- If the pump doesn’t run, check that the pump is working by connecting it directly to the 3V and GND pins of the micro:bit (bypassing the relay).
- If the pump works when out of the soil, you may have wet soil, or need to try using a higher number in your
ifstatement to make the pump turn on.
Challenges
Now that you have a self-watering plant, what other sensors could you add, and what other electronic modules can you use to change your plant’s environment?
A good start might be to use some sensors to monitor the plant's environment. You could also try using lights or heating pads, or just scale up the project to look after lots of plants! For a complete micro:bit project, you could also check out the Kitronik Greenhouse kit.
We’d love to see your projects!